![]()
 On the Text Table
tab, you can change the title of the chart and add or remove information
from the display. Customize the text table variables and click OK.
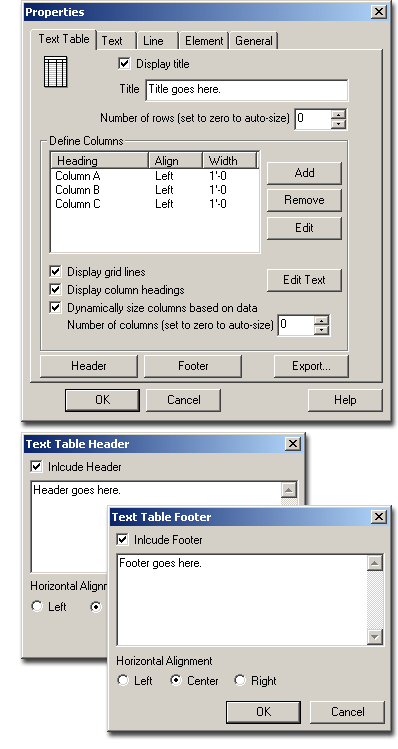
On the Text Table
tab, you can change the title of the chart and add or remove information
from the display. Customize the text table variables and click OK.
To have the title appear with on the text table, check the Display Title box.
To rename the text table, enter a new name in the Title window.
Setting the Number of Rows to 0 allows the chart to expand each time a new row is necessary.
Click the Add button under Define Columns to open the Text Table Column dialog.
Select an existing column from the Define Columns window and click Remove to eliminate it from the chart.
Select an existing column from the Define Columns window and click Edit to alter the column's Heading, Alignment or Width.
Click the Edit Text to alter the information presented in the table.
To hide the vertical and horizontal lines that form the table, leave the Display Grid Lines box unchecked.
To hide the names of the tables column's, leave the Display Column Headings box unchecked.
With the Dynamically Size Columns Based on Data box checked, the columns of the table with shrink or expand according the amount of information entered in each cell.
Setting the Number of Columns to 0 allows the chart to expand each time a new column is necessary.
Click the Header button to open the Text Table Header dialog. Check the Include Header box, enter the desired text in the window and assign it a Horizontal Alignment below before clicking OK to return to the Text Table tab.
Click the Footer button to open the Text Table Header dialog. Check the Include Footer box, enter the desired text in the window and assign it a Horizontal Alignment below before clicking OK to return to the Text Table tab.
![]()