![]()
To highlight areas of a drawing, such as installation details, use the cloud element in AlarmCAD for AutoCAD.
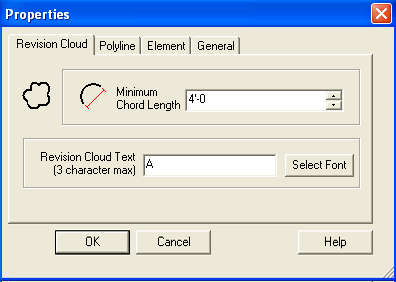 1. On
the AutoCAD Draw toolbar, select
the Revision Cloud
tool. The Revision Cloud dialog
on the left appears in the drawing, so enter a minimum length for each
chord of the Cloud. The default minimum length is four feet, but can be
changed as needed.
1. On
the AutoCAD Draw toolbar, select
the Revision Cloud
tool. The Revision Cloud dialog
on the left appears in the drawing, so enter a minimum length for each
chord of the Cloud. The default minimum length is four feet, but can be
changed as needed.
2. To enter any identifying text or number for the detail, do so in the Revision Cloud Text field. 'A' displays in the image.
3. Click the Select Font button to change font style and/or size properties.
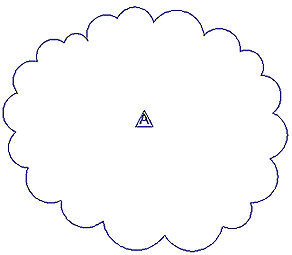
 4. Next,
while holding down the left mouse button, drag and guide the cursor along
the cloud's path in a counter-clockwise motion. The default revision cloud
displays with a smoothing bulge, which is shown in the left image. If
a clockwise motion is used to draw the cloud, then it displays with inverted
arcs, as in the right image. Note the triangle inside the cloud contains
the identifying text, 'A.'
4. Next,
while holding down the left mouse button, drag and guide the cursor along
the cloud's path in a counter-clockwise motion. The default revision cloud
displays with a smoothing bulge, which is shown in the left image. If
a clockwise motion is used to draw the cloud, then it displays with inverted
arcs, as in the right image. Note the triangle inside the cloud contains
the identifying text, 'A.'
5. Release the left mouse button when finished drawing the cloud.
6. To access and/or modify polyline lengths and bulge factors for individual arcs comprising the cloud, double-click the object in the drawing. Alternatively, highlight the cloud, right-click, and choose Properties from the menu.
Settings Menu/Default Properties Submenu
![]()