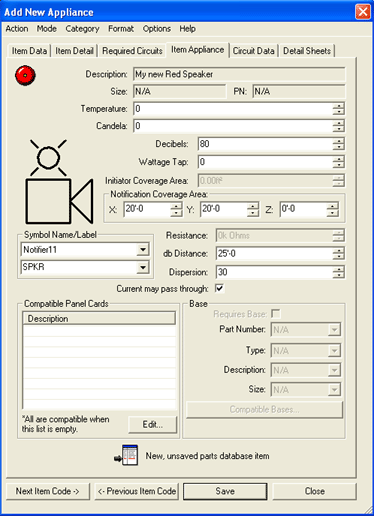
 As new Initiating and Notification
Appliances are added to the Parts Database, the Item
Appliance Tab stores data such as the device's Temperature/ Candela
ratings and Coverage Area. For any device, the Label/Symbol Name, Compatible
Panel Card and, if applicable, Base data are also defined in the Item
Appliance Page.
The notification device's Description, Size and Part Number fields are displayed in the left image (originally defined in the Item Data Tab).
Depending on the type of device, the Temperature, Candela, Decibel and/or Wattage Tap fields will be enabled for modifications.

The Initiator Coverage Area field is modifiable, along with the Notification Coverage Area fields.
Adjust the device's coverage area as needed by entering values into the X, Y and Z coordinate fields. These fields are editable during the item's entry into the Parts Database as well as when the device is being updated within its default Properties Page.
The Symbol Name and Label dialog box contains editable fields where users can select from a drop-down menu or customize the Name/Label.
![]() The Resistance field is editable
for devices such as the end-of-line resistor. For audible devices, the
db Distance and Dispersion
fields will be enabled for the user to enter values.
The Resistance field is editable
for devices such as the end-of-line resistor. For audible devices, the
db Distance and Dispersion
fields will be enabled for the user to enter values.
The Current may pass through option is turned on by default, but can be disabled.
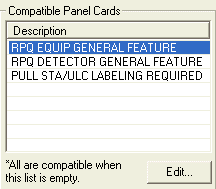
 The Compatible Panel
Cards dialog on the left includes the descriptions for those cards
that are compatible with the device. If none are listed, then all cards
are considered compatible with the device.
To add a Panel Card, click on the Edit button to pull up the Appliance/Card Compatibility dialog, then click the Add Member button. Change one card to another by clicking the Change Member button. Remove a Panel Card from the list with the Remove Members button.
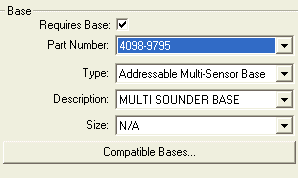
 Base information, if applicable, can be added to the
device within the Item Appliance Tab. The Base's data includes Part
Number, Type, Description and Size.
To add a compatible base to the device, click the Compatible Bases button, which pulls up the Appliance/Base Compatibility dialog below left. Next, click the Add Member button. Change one base to another by clicking the Change Member button. Remove a Base from the list with the Remove Members button. Alternatively, highlight the base in the list to be modified, then choose another from the drop-down menu.
![]() Please Note: Once
additions, changes, and removals are completed, modifications will be
effective immediately and cannot be undone (unless the item is edited
in another section of the database interface).
Please Note: Once
additions, changes, and removals are completed, modifications will be
effective immediately and cannot be undone (unless the item is edited
in another section of the database interface).