![]()
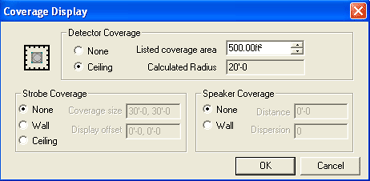
The Coverage Display dialog offers coverage display parameters for an initiator (detector), strobe and speaker.
 Options for a detector
(also known as an Initiator) coverage
area include None or Ceiling. For those opting to display
a ceiling coverage area, insert the device's listed coverage area in the
corresponding field. In the image, the value is 500 sq. ft. This value
will cause the Calculated Radius
field to populate.
To view a sample detector coverage area display, click here.
 • Assign the strobe's coverage area display through the
Coverage Display dialog. By default,
None, or no coverage will display.
• Select Wall coverage to assign a rectangular coverage area to a wall strobe. Any previously-assigned coverage size values can be overridden by entering new X and Y coordinate lengths.
• Select Ceiling to assign a rectangular coverage area to a ceiling strobe. Any previously-assigned values will be overridden by entering new X and Y coordinate lengths.
• To assign a display offset for either the wall's or ceiling's coverage display, enter the offset's X and Y coordinates in the corresponding fields, which can be assigned positive or negative values.
• Click here to view a strobe's coverage area display.
 • Assign the speaker's coverage area display through the
Coverage Display dialog as well.
Again, by default, None, or no
coverage will display.
• Select Wall, and the Distance and Dispersion fields will auto-populate.
• Select Ceiling, and the Distance field will auto-populate.
• Click here to view a speaker's coverage area display.
Notification Appliance Properties Page