![]()
 Clicking the Ohm Meter
icon from the Alarm Tools toolbar
or selecting Ohm Meter from the
Tools menu equips the cursor to
place a voltage, current and resistance-measuring device on any appliance
in the drawing.
Clicking the Ohm Meter
icon from the Alarm Tools toolbar
or selecting Ohm Meter from the
Tools menu equips the cursor to
place a voltage, current and resistance-measuring device on any appliance
in the drawing.
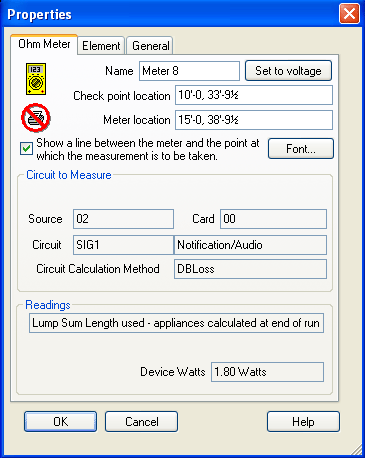
To access an Ohm Meter’s Properties page, double-click the meter label in the drawing. Alternatively, right-click on the meter label in the drawing, and choose Properties from the pop-up menu.
On the Ohm Meter Properties page, you can change the Name, Check Point Location, or Meter label location. Note that both Check Point and Meter label locations are relative to the current position of the benchmark. Show a Line between the meter and the point at option, if checked, displays a leader line from the point of measurement to the meter in the drawing. Click the Font button to alter the appearance of text on the Meter label.
The meter's source, panel card, circuit type/subtype, and calculation method are displayed within this dialog box.
Depending on the type of calculation method used, the meter's current, voltage, and voltage drop readings are displayed. For the dB Loss method used in the diagram, the meter's wattage reading, 1.80 Watts, is displayed.
Design Standards: Calculations Page
![]()