 A device's default Properties
page holds the Appliance Material
tab (left image). This page stores important stock listing values such
as material cost and hours required for fabrication, field, programming,
and inspection labor.
Users can widen and narrow the column headers as needed. Each Trim Kit associated with the device is listed in the top list dialog box. Default Material, which is defined in AlarmCAD for AutoCAD's Parts Book, displays in blue text, and the user's Added Material displays in green text.
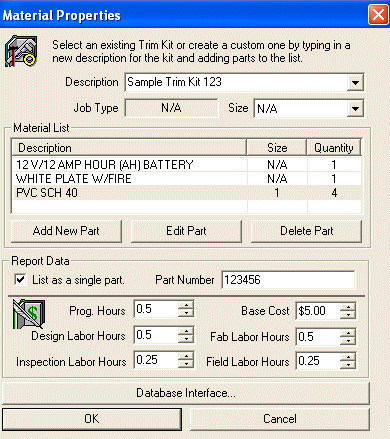
To add a new Trim Kit for the device, click the Add List button to pull up the Material Properties dialog, shown below left.
For additional information on adding, editing or deleting individual components comprising a Trim Kit, click here.
 Once the Material Properties page appears on
the left, select either an existing Trim Kit from the top Description
field's drop-down menu, or create a customized kit by entering a new description
in the editable Description field.
In some instances, existing Trim Kits may have different sizes available
in the Size drop-down menu.
If an existing Trim Kit is chosen from the drop-down menu, its individual components automatically populate the Material List dialog in the middle of the page. Individual parts can be added, edited and deleted within Trim Kits.
To add and customize individual parts to a Trim Kit, see the next Add, Edit, or Delete Parts section below.
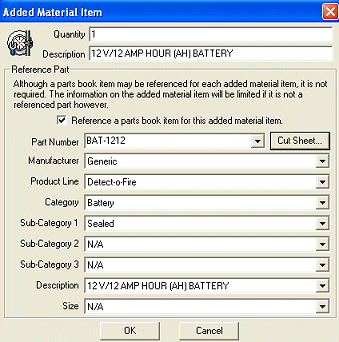
 Click the
Add New Part button (shown in the Material Properties image above)
to open the Added Material Item
dialog on the left. Although Parts Book items can be referenced for each
new Trim Kit item, is it no required.
Data entered into the Trim Kit list dialog will be limited if they are NOT referenced parts. Only the Description, Size and Quantity fields are editable when the Parts Book is not referenced. So, checking the Reference the Parts Book for this Trim Kit Item option box is necessary if these Trim Kit items should reference the Parts Book. Click OK when finished with the modifications.
To edit an existing Material item, select the item from the Material List dialog in the Material Properties page, then click the Edit Part button, which pulls up the Added Material Item dialog as well.
Please Note: If only the quantity needs to be modified, change it directly in the Material List dialog by highlighting its cell in the Quantity field, then changing the value.
If a part should be deleted entirely from the Trim Kit, highlight the part in the Material List dialog, then click the Delete Part button.
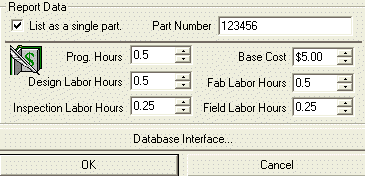
 The Report
Data section offers an option to List
as a single part in the Stock Listing, Bill of Material, and Purchase
Order Reports. Checking this option allows users to insert its Part Number,
Base Cost, Fabrication Labor Hours, and Field Labor Hours for the Trim
Kit. When
the option is selected, the Trim Kit as a whole will display in reports,
not the individual parts comprising the kit.
If the List as a single part option is NOT selected, the parts comprising the Trim Kit will display individually in the reports, rather than the Trim Kit as a whole.
The Database Interface button allows users to reference Job Types (API, Default, or Government) associated with the Trim Kit. For more information on controlling database entries, see the Parts Database Menu.
Default Properties Pages Overview
![]()