![]()
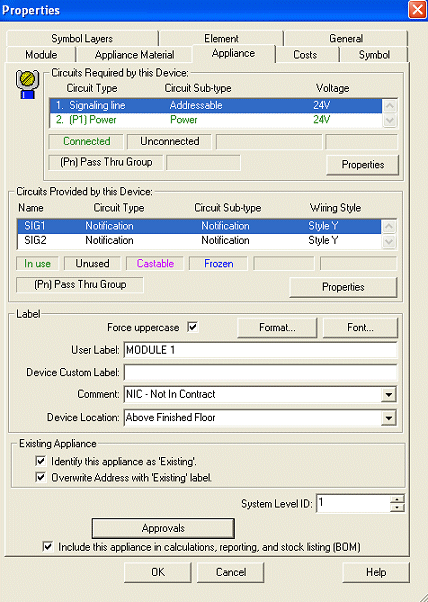 The Appliance
page (tab) presents each appliance's circuit properties such as Circuits Required and Circuits
Provided by the Device. Additionally, the appliance's Label Information
and Existing Appliance data is located within this page.
The Appliance
page (tab) presents each appliance's circuit properties such as Circuits Required and Circuits
Provided by the Device. Additionally, the appliance's Label Information
and Existing Appliance data is located within this page.
Please Note: When no circuits are required nor provided by the device (and consequently not listed), the Properties buttons are disabled within these dialog boxes. For Initiating and Notification Devices, the Appliance page offers Coverage Display options, which are also defined as users add these new devices to the Parts Database. To learn more about adding new appliances to the Parts Database, click here.
To learn more about each dialog box within the Appliance page, click on one of the links below:
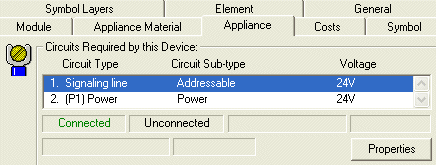
The Required Circuits dialog box lists circuits by their Type, Sub-type, and Voltage. Each circuit's properties can be adjusted by highlighting the circuit's row, then clicking the Properties button. Each circuit's status will match the corresponding colors as indicated in the Connected, Unconnected, etc. boxes below the circuit list.
The Provided Circuits dialog box lists circuits by their Name, Type, Sub-type, and Wiring Style. To edit the Circuit's Properties, first highlight the circuit row, and then click the Properties box. Each circuit's status will match the corresponding colors as indicated in the In Use, Unused, Castable or Frozen., etc. boxes below the circuit list.
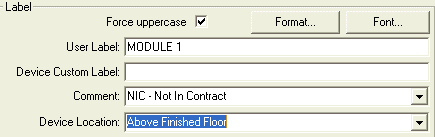 An appliance's label can be
edited within the Appliance page.
An appliance's label can be
edited within the Appliance page.
The default 'Force Uppercase' option displays labels as if the CAPS LOCK key were turned on, but users can un-check the option box.
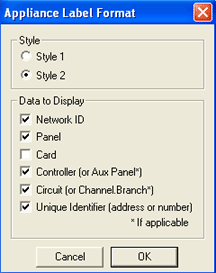 To edit appliance labels' format and font, click these
option boxes. The Appliance Label Format
dialog on the right appears after clicking the Format
button. Here, users can choose from 'Style 1' or 'Style 2' format.
For more information on appliance label settings, click
here. Users choose the Data to Display
such as Network ID, Panel, Panel Card, Controller, Circuit, and/or Unique
ID.
To edit appliance labels' format and font, click these
option boxes. The Appliance Label Format
dialog on the right appears after clicking the Format
button. Here, users can choose from 'Style 1' or 'Style 2' format.
For more information on appliance label settings, click
here. Users choose the Data to Display
such as Network ID, Panel, Panel Card, Controller, Circuit, and/or Unique
ID.
Any entries to the User Label and Device Custom Label fields will display in the drawing, and when printed.
Insert comments to explain reasons as to why the appliance is in the drawing, which can help users with the estimating process.
The Device Location describes the physical location of the device within the floor plan, such as 'Above the finished floor,' 'Above the ceiling,' 'Sub-floor,' etc.
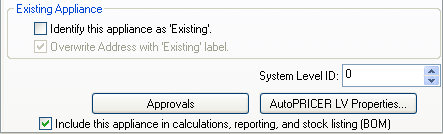 If an appliance should be
identified as 'Existing,' the corresponding option box can be checked,
Identify this appliance as 'Existing.'
As a result, the letter E
will display next to the appliance, in addition to the appliance's address.
If an appliance should be
identified as 'Existing,' the corresponding option box can be checked,
Identify this appliance as 'Existing.'
As a result, the letter E
will display next to the appliance, in addition to the appliance's address.
The second option, 'Overwrite Address with 'Existing' label,' can be selected as well. As a result, the appliance label will not display the appliance's address, but ONLY the letter 'E.' Please note that both of these options are not turned on by default.
The System Level ID is now editable from the device's Appliance page. This field is a useful reference for future reports, such as the Riser Detail Report. Differentiate which appliances belong to each Level/Floor 1, 2, 3, etc. in multi-level buildings. Sub-levels (-1, -2, etc.) can also be placed in the field.
.gif) Pressing the Approvals
button displays the Approval Codes for a particular device. The image
on the right shows the approval authorities required on certain devices.
Pressing the Approvals
button displays the Approval Codes for a particular device. The image
on the right shows the approval authorities required on certain devices.
The last option, Include this appliance in calculations, reporting, and stock listing (BOM), is turned on by default, but can be turned off.
Connect Appliances to Circuit Command
Default Properties Pages Overview
Set Device Custom Label Command
![]()