![]()
 The Bill of Materials
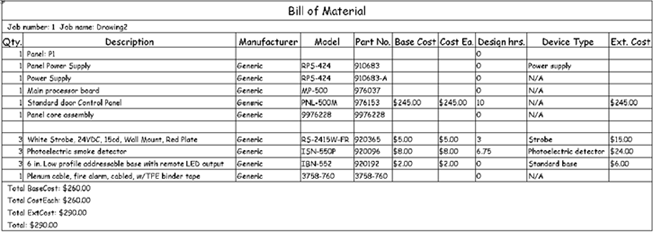
reporting tool compiles product information before equipping the cursor
to place the data, in chart form, into the drawing. To initiate the Bill
of Materials tool, go to the Reports
menu/Bill of Materials submenu.
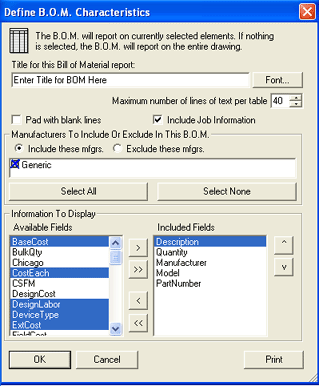
Once the Define B.O.M. Characteristics
dialog appears on the left, users choose the information to include in
the report.
At the top, enter a title for the Bill of Material report. Change the font as needed via the Font button, as if in a word processing program.
Maximum number of lines of text per table defaults to 40, but is adjustable.
Pad with blank lines is turned off by default. As a result, the report fits the exact number of items. When enabled, extra rows are added to the bottom of the report, which adjusts to the maximum number of lines specified above.
Include Job Information is turned on by default, which displays any job, contact, and pricing data specified in the Job Settings pages.
Next, users select which manufacturers to include in or exclude from the report. In the above image, only the Generic manufacturer is available. Select All and Select None include and exclude all items.
From the Available Fields list, users select the data to include in the Bill of Materials report.
1. Add items from the Available Fields list to the Included Fields list by highlighting the items, as the left image illustrates. Highlight items with a single mouse-click. Items listed in the Included Fields list will appear as column headers in the BOM report.
![]() 2. When finished
with selections, click the single, right-arrow button. The selected items
transfer to the Included Fields
list.
2. When finished
with selections, click the single, right-arrow button. The selected items
transfer to the Included Fields
list.
![]() 3. To remove items from the Included
Fields list, highlight the item(s), then click the single, left-arrow
button.
3. To remove items from the Included
Fields list, highlight the item(s), then click the single, left-arrow
button.
![]() 4. To add ALL items
from the Available Fields list
to the Included Fields list, simply
click the double-right arrow button. Highlighting all items is not necessary.
4. To add ALL items
from the Available Fields list
to the Included Fields list, simply
click the double-right arrow button. Highlighting all items is not necessary.
![]() 5. To remove ALL items from the Included Fields list, click the double
left-arrow button. Again, highlighting all items is not necessary.
5. To remove ALL items from the Included Fields list, click the double
left-arrow button. Again, highlighting all items is not necessary.
![]()
![]() 6.
Users can sort items in the Included
Fields list in any order by using the
up/down arrow keys. After highlighting the item to move up or down, click
the up or down arrow
button to move it to another position.
6.
Users can sort items in the Included
Fields list in any order by using the
up/down arrow keys. After highlighting the item to move up or down, click
the up or down arrow
button to move it to another position.
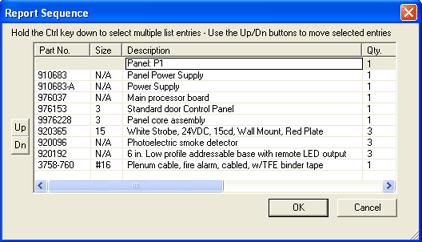
 7. Once the items
in the Included Fields list appear correctly, click OK
to view the Report Sequence
dialog on the left. Every cell within this dialog is editable, so users
can change data before the BOM is printed. The horizontal scroll bar allows
users to view every column header.
