Similar to the Set User Label command, Set Device Custom Label data also appears in the Appliance Tab's Label dialog. In addition, reports such as the Appliance List and Appliances By Circuit will display the Device Custom Label data.
Set Device Custom Label allows users to assign a group of appliances with an associated Device Custom Label. For complex floor plans, this is a practical way to divide the floor plan into sections so installers, inspectors, etc. can differentiate which appliances belong to each wing, room, hallway, stairwell, etc.
Insert and customize the text line into the drawing by using the Text Line toolbar button or accessing the Tools menu/Text Line submenu.
.gif) The appliances to be associated
with the Device Custom Label must be highlighted in the drawing. After
all the desired appliances are highlighted, highlight and target the text
line that will become the Device Custom Label for the selection. Below
the text line should display two small gray squares, indicating that is
the last, target element selected.
The appliances to be associated
with the Device Custom Label must be highlighted in the drawing. After
all the desired appliances are highlighted, highlight and target the text
line that will become the Device Custom Label for the selection. Below
the text line should display two small gray squares, indicating that is
the last, target element selected.
Please note how the notification devices and text line Room 100 are highlighted in the image to the right as well. Last, initiate the command by accessing the Commands Menu/Set Device Custom Label Submenu.
Please Note: If the target element is not a text line, the following warning will appear:
.gif)
 Please Note: When the command runs, no progress message
appears, but the command still executes.
Please Note: When the command runs, no progress message
appears, but the command still executes.
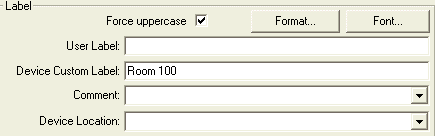
Check results by double-clicking one of the appliances and pulling up its Properties page. In its Appliance Tab/Labels Dialog box, the label should appear as in the image on the right.
![]()