![]()
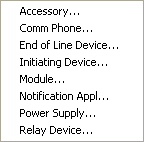 Add New Appliance opens a submenu listing item categories
such as Accessory Devices, Communication Phones, End-of-Line Resistors,
Initiating Devices, Modules, Power Supplies, and Relay Devices. Users
select one of the menu items to create a customized set of properties.
Add New Appliance opens a submenu listing item categories
such as Accessory Devices, Communication Phones, End-of-Line Resistors,
Initiating Devices, Modules, Power Supplies, and Relay Devices. Users
select one of the menu items to create a customized set of properties.
For additional information about each page comprising the Add New/Modify Existing dialog, click on the links below.
The Item Data Page holds the device's descriptive characteristics such as category and manufacturer data.
The Item Detail Page contains model, part number, base cost, labor hours and approval data.
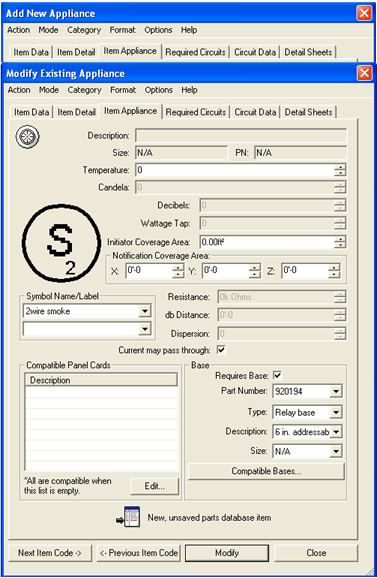
The Item Appliance Page on both the Add New Appliance and Modify Existing Appliance dialogs contains current settings, coverage areas, symbol properties, and other data. To alter any characteristics presented in this page shown on the left, use the up/down arrow buttons or select from the drop-down menus.
The Required Circuits Page allows users to designate essential circuits that must be in place for the appliance to operate.
Every appliance now has a Circuit Data Page that allows users to associate available circuits provided by the appliance.
Add Detail Sheets to appliances as needed.
Item Code vs. Part Number
When adding a new item, the top Item Code field is not editable. New items are defined through the Manufacturer, Product Line, Category, Sub-Categories, etc. fields, and in all other tabs. Users can peruse through the items one at a time by Next Item Code or Previous Item Code.
![]() Alternatively, users can peruse
by one part number at a time. The Next Part Number and Previous Part Number
buttons allow navigation through the Parts Database one Part Number at
a time. Navigational control by part number or item code is assigned via
the Action menu, which is explained
in more detail below.
Alternatively, users can peruse
by one part number at a time. The Next Part Number and Previous Part Number
buttons allow navigation through the Parts Database one Part Number at
a time. Navigational control by part number or item code is assigned via
the Action menu, which is explained
in more detail below.
The Action menu contains several commands and navigation controls when adding new items to the Parts Database.
The View Next/View Previous options on the left allow users to peruse through the Parts Database one part number at a time, as long as the following option, "View Next/Previous searches for part number vs. item code," is turned on (has a check-mark next to it.)
Otherwise, the Next Item Code/Previous Item Code buttons located on the bottom left of the main dialog above allows the perusal of one item code at a time.
For more information on cloning parts, click here.
For more information on how to map circuit pass-through groups, click here.
Allows users to switch to/from the Add New Item/Modify Existing Item modes
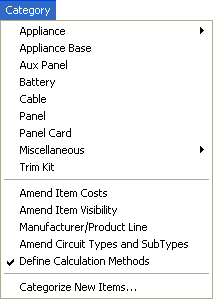
This menu pulls up all available categories of Parts Database items such as appliances, appliance bases, cables, etc.
Several commands are also available within this menu:
This menu pulls up the Number Format Settings dialog.
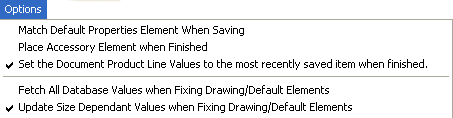
The Options menu offers several commands that help with parts entry. Match Default Properties Element When Saving option causes the newly-saved part to match the properties of the Default Properties Element.
Place Accessory Element When Finished causes the tool representing the current category to be placed in the drawing upon closing of the Parts Database Interface. This will only happen if the category at the time of closing is represented by a drawing tool.
When the Set Product Line option is checked, the Product Line Toolbar Manufacturer and Product Line' values will match those of the most recently saved or modified item. The Default Properties Element will not be affected.
When enabled, the Fetch all Database Values option causes any item in the drawing, or any default properties element matching a saved or modified item, to be updated to match its database cost value. If this option is not selected, all database values for these items will be updated.
When the Update Size option is enabled, any item in the drawing, or any default properties element matching a saved or modified item, will be updated to match its size values. If this option is not selected, all database values for these items will be updated.
The Help menu offers useful 'Quick Tips' and along with access to AlarmCAD's help file.
Click Save to store the new item for future use or Close to cancel the addition and close the dialog. Once the new item has been saved, it will appear in the Parts Tree Toolbar. If the Parts Tree is already viewable, notice that it refreshes itself, and the new part appears in the user-specified manufacturer's folder.
![]() Note: Close vs. Cancel
Note: Close vs. Cancel
The Cancel button only appears when an item is in Modify mode and the Modify button has been clicked but any changes made have yet to be saved. The Close button appears before a new item has been saved or when the dialog is in Modify mode with an existing item before the Modify button has been clicked. Close is always an option in the dialog’s Action menu.
Cancel eliminates any changes made on the various dialog tabs and returns the dialog to its pre-modified status, whereas Close either halts the new item creation process or eliminates the dialog from the screen and returns functionality to the drawing field.
![]()