![]()
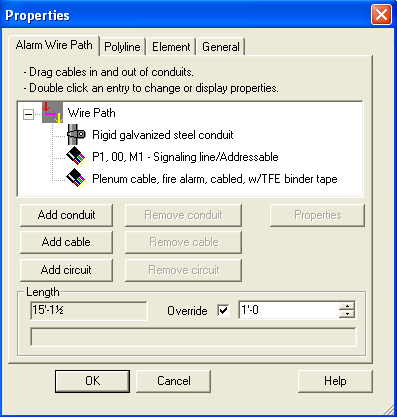 AlarmCAD for AutoCAD's Wire Path tool connects appliances to
one another in the drawing, which can prepare appliances to connect electrically
through a circuit. Wire Paths appear as a line segment or polyline in
the drawing, thus the Polyline
tab is part of the Properties page shown in the left image. Users can
choose whether or not wire paths contain electrical properties (circuits),
cables, and conduits.
AlarmCAD for AutoCAD's Wire Path tool connects appliances to
one another in the drawing, which can prepare appliances to connect electrically
through a circuit. Wire Paths appear as a line segment or polyline in
the drawing, thus the Polyline
tab is part of the Properties page shown in the left image. Users can
choose whether or not wire paths contain electrical properties (circuits),
cables, and conduits.
As appliances are connected with wire paths in manual mode, no circuit is automatically generated. As a result, no circuit will display in the Wire Path Properties page.
If automatic connection mode is enabled, a circuit will automatically generate that matches the appliance type and subtype. In the image, the circuit P1, 00, M1 - Signaling Line/Addressable was generated since the wire path connected the source (Fire Control Panel) to an addressable notification module.
If applicable, users can manually add conduit (e.g. Rigid galvanized steel conduit) and cable (e.g. Plenum fire alarm cable with TFE binder tape) to the wire path as needed, as illustrated in the properties page.
![]() At the top of the properties page are two helpful instructions.
The first, Drag cables in and out of
conduits allows users to click-and-drag cables and circuits to
their associated conduits. Since several circuits can comprise one wire
path, consequently, more than one cable and/or conduit can also comprise
the wire path.
At the top of the properties page are two helpful instructions.
The first, Drag cables in and out of
conduits allows users to click-and-drag cables and circuits to
their associated conduits. Since several circuits can comprise one wire
path, consequently, more than one cable and/or conduit can also comprise
the wire path.
The second, Double-click an entry to change or display properties, allows users to access the circuit, cable, and/or conduit's individual properties page.
When pressed, inserts the default conduit. In this case, 'Rigid galvanized steel conduit' has been added to the wire path. To change the conduit's properties, double-click this entry in the list, and the conduit properties page appears.
Click here to be routed to the Conduit's Properties page.
When pressed, inserts the default cable. In this case, 'Plenum cable, fire alarm, cabled, with TFE binder tape' has been added to the wire path. Remember, cables can be moved under another conduit in the list with the click-and-drag motion. To view the cable's properties page, double-click it in the list.
Click here to be routed to the Cable Properties page.
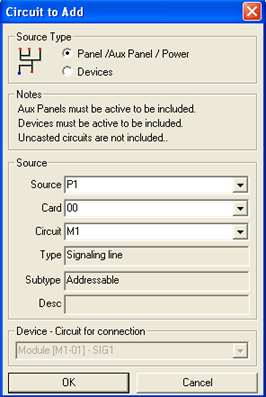 When pressed (in manual connection
mode) pulls up the Circuit to Add
dialog (shown in left image).
When pressed (in manual connection
mode) pulls up the Circuit to Add
dialog (shown in left image).
Select the Source Type in the top dialog box. Choose from either a Panel/Auxiliary Panel/Power Supply source or a device source. Auxiliary Panels and devices must be active to be included as a source choice. Also, uncasted circuits will not be included as choices.
The Source dialog box in the lower half of the dialog contains choices specific to the Source Type chosen in the top dialog box. Since the Panel/Aux Panel/Power option was chosen in the diagram, the Source, Card and Circuit options are available in this dialog.
If the Devices Source Type option was chosen at the top, only the Device-Circuit for Connection drop-down menu would be enabled on the bottom.
Please Note: When pressed (in automatic connection mode), a friendly AlarmCAD for AutoCAD warning dialog appears, prompting users to change to manual connection mode. To add circuits through the Alarm Wire Path's Properties page, manual connection mode must be enabled. Users must press Yes within this warning dialog to continue to the Circuit to Add dialog.
Click here to be routed to the Circuit's Properties page.
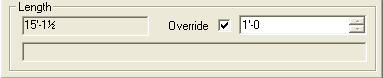 The wire path's length displays at the bottom of its Properties
page.
The wire path's length displays at the bottom of its Properties
page.
At the left, its length (in units defined in the Number Format Settings) displays in the example as '15'-1 ½.' Its override length is enabled, and listed as '1-0.' When enabled, the override length can be modified as needed.
![]()