![]()
.gif)
.gif)
To place an Auxiliary Panel (formerly known as a Transponder) into the drawing, left-click its icon located within AlarmCAD for AutoCAD's Alarm Tools Toolbar, and drag it directly into the drawing. It is also accessible from the Tools Menu/Auxiliary Panel submenu.
By default, a generic NAC Transponder appears, but its properties can be changed by accessing its Properties page (shown in right image). A manufacturer-specific Auxiliary Panel can also be placed directly from the Parts Database. The Auxiliary Panel is similar to a Fire Alarm Control Panel, but unlike the Fire Alarm Control Panel, it can also contain required circuits.
To access the Auxiliary Panel properties page, double-click the Auxiliary Panel symbol in the drawing (see image above), and the Properties page will appear (see image above right). Alternatively, right-click on the symbol and choose Properties from the pop-up menu. At the top of the Properties Page, the panel's Name and Network ID (if applicable) are shown.
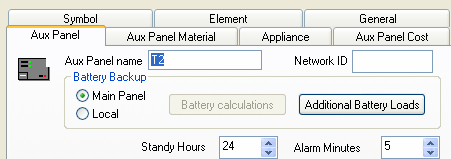
Once the Properties Page appears, the first two fields show the auxiliary panel's name and Network ID.
The Battery Backup dialog box offers two options, Local and Main Panel. By default, Local is selected.
If Local Battery Backup is selected, Battery Calculations and Additional Battery Loads can be defined by clicking the corresponding boxes.
If a Main Panel is chosen, then only the Additional Battery Loads can be defined.
The battery's Standby Hours default to 24 hours, but are adjustable, as are the Alarm Minutes, which default to 5 minutes.
 The product line displays
toward the top of the Catalog Info dialog. In
this image on the right, the
product line is Generic Detect-o-Fire,
but manufacturer- specific products are available from the Parts Database
within the Parts Tree. Insert the specific manufacturer's part if desired,
by selecting, then dragging the part directly into
the drawing.
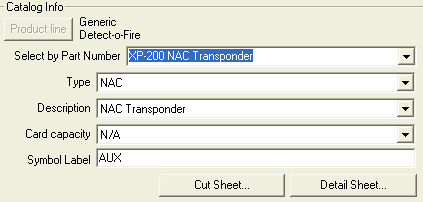
The product line displays
toward the top of the Catalog Info dialog. In
this image on the right, the
product line is Generic Detect-o-Fire,
but manufacturer- specific products are available from the Parts Database
within the Parts Tree. Insert the specific manufacturer's part if desired,
by selecting, then dragging the part directly into
the drawing.
Depending on the part chosen, it may or may not have an additional Type, Description, or Card Capacity to further describe it. Customize the symbol's label in the drawing if the part's description is not available from the drop down menus.
Click the Cut Sheet button to open an Adobe .pdf file with the manufacturer's specs.
The Detail Sheet button will direct users to the manufacturer's website, intranet, etc. and display the installation Detail sheet drawing, if it is available for the part.
 Control Panel Cards located within the device are listed
within the last dialog box in the Properties page. From this dialog box,
add a new Auxiliary Panel Card, edit an existing card's properties, or
delete the card entirely.
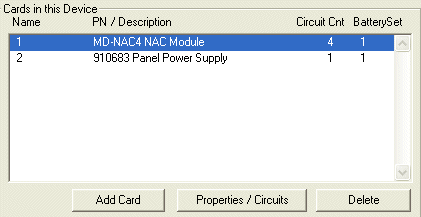
Control Panel Cards located within the device are listed
within the last dialog box in the Properties page. From this dialog box,
add a new Auxiliary Panel Card, edit an existing card's properties, or
delete the card entirely.
Note: For more information on adding a new Card to a Control Panel or modifying each Card's existing properties, click on the image.
On the Appliance Material tab, assign material and trim kits to the device to be picked up during listing.
The Appliance tab presents Connection Data, Requirements and Circuit load in addition to Network Circuit Data.
The Costs tab allows users to assign the cost-per-item and labor costs to be used in stock listing and other reports.
Refine the on-screen presentation of the device's appearance, location, rotation and scale on the Symbol tab.
The Element tab displays the Unique ID number and lists other elements to which it is joined.
On the General tab, change the device's color, layer, line properties and rendered characteristics.
Fire Alarm Control Panel Properties Pagel
![]()